Simple Gnome Application Using libglade and C/GTK+
This tutorial is intended for those people interested in getting started developing Gnome applications using GTK+. Specifically, it uses the Glade Interface Designer to build a the user interface and C/GTK+ to write the code for a Gnome application. The application will simply be a window with a typical toolbar and status bar. This application will be used in later tutorials to demonstrate various other aspects of Gnome programming.
This tutorial is based on the older version of Glade (glade2). For an up-to-date tutorial on using Glade 3, see: GTK+ and Glade3 GUI Programming.
Let's Get Started
For the purposes of this tutorial, I will be building this project on my system at /home/mcarrick/Projects/gnome3/. All the screenshots and open/save locations will reflect that location. When discussing the path hierarchy, I will be talking about it relative to that path. For example, putting source code in the /src directory means that it is actually in the /home/mcarrick/Projects/gnome3/src directory. Got it? Good. So you should have made a 'gnome3' directory somewhere and a 'src' directory within that directory.
The project we will be building is giong to be called 'gnome3', and is just a basic Gnome application. The '3' comes from the fact that I already have a gnome1 and a gnome2 from some older tutorials.
Building the Interface in Glade
The Glade Interface Designer, or just Glade, is a Gnome application which allows us to layout our widgets visually rather than through C code. What's a widget right? A widget is much like an "object" in object oriented vocabulary. Only most widgets in GTK+ are physically visible. In Windows programming, we might call these "controls". A button is a widget, the label on that button is another widget, the window is a widget, the scroll bars are widgets, etc. Widgets, like objects or classes, can be derived from other widgets. A window widget may be derived from a container base widget etc. This relationship is known as the widget or object hierarchy.
So let's see what I'm talking about. Start Glade and select 'New' from the 'Project' menu, and then click the 'New GNOME Project' button. Now, before we go any further, let's get our windows visible. We'll learn what they all do as the tutorial progresses. For now, just make sure you have the Pallette, Property Editor, and Widget Tree windows open. You can do so from the 'View' menu in the main Glade window.
We're going to add a Gnome Application Window to our project by clicking the icon located in the Glade toolbar under 'Gnome'. A window should pop up. That is the Gnome Application Window and the main window for our application. The Gnome Application Window is actually a GnomeApp widget, part of libgnomeui. The API documentation states: "The GnomeApp widget and associated functions provides the easiest way to create an almost complete GNOME application in libgnomeui". It's very true. It's a very easy way to setup the base of a Gnome application. Now back to talking about widgets and object hierarchy, the object hierachy for the GnomeApp widget is shown below.
 GObject
 +----GtkObject
	 +----GtkWidget
 		+----GtkContainer
 			+----GtkBin
				 +----GtkWindow
					 +----GnomeApp
As we can see, the GnomeApp is derived from the GtkWindow, and so on up the tree. At the top of the tree is GObject which is the base object for all other objects. It is part of glib (the core, low-level functions and utilities at the base of Gnome and GTK). It's prefix is a 'G'. From now on, associate a single 'g' with glib. Objects that start with 'G' and functions that start with 'g_' are typically going to asociated with glib. Then, we have several objects with a prefix "Gtk". Those are part of GTK. Objects that begin with 'Gtk' and functions that begin with 'gtk_' are typically associated with GTK+. And finally, the GnomeApp has 'Gnome' as the prefix. It is part of the Gnome UI library. Objects that begin with 'Gnome' and functions that begin with 'gnome_' are associated with the Gnome libraries. This will become quite obvious as you begin writing code later on in the tutorial.Back to Glade, we are going to rename the GnomeApp widget to something more nice and give it a title, which shows up in the window's "titlebar". To rename the widget, click to select 'app1' in Glade's main window or the Widget Tree window, and change the 'Name:' property in Glade's Properties window to 'app_window'. Also change the 'Title' property in Glade's Properties window to 'Gnome Application 3'. Below is a screenshot from my system.

Before we go any further, let's save the glade file (an XML file). Click the 'Save' icon. In the save dialog, we're going to save the file as src/gnome3.glade. Glade can generate C or C++ source code which compiles to build the application you design, however, that method is no longer the ideal way to use Glade. Instead, the Glade project file, a .glade file, is parsed by the application at run-time using libglade. This allows you to modify/update the UI without having to recompile the entire program and allows the program to be separate from the interface. So, when saving, the only thing we're actually concerned with is the name and location of the 'Project' file. We're not going to let Glade generate the code so the other parameters are not relevant for this tutorial. My screenshot is below.

Now there's just one more thing to do in glade. We're going to attach a handler to the 'New' toolbar button's 'clicked' signal. A signal can be thought of as an event that occurs. Most objects have a variety of signals they "emit" for various events and they also inherit there base objects signals. You can find out what signals an object has by refering to the API documentation for that object. The handler for the signal, is a callback function, and is called when that signal is "emitted".
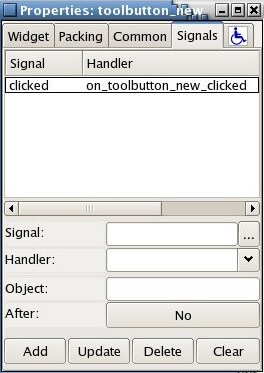
Click on the 'toolbar_new' button to select it, and then switch to the 'Signals' tab in the Properties window of Glade. Then at the bottom of the window, there is a box labeled 'Signal:'. Click in the box to show the Select Signal dialog. You can select any of the signals associated with the GtkToolButton widget or the widgets it's derived from. Choose the 'clicked' signal and click the 'Ok' button. Now back in the Properties window,the 'Handler:' box has been filled in with "on_toolbutton_new_clicked". We're going to leave that as it is. Click the 'Add' button at the bottom of the window to apply these changes. You window should look like mine below. "on_toolbutton_new_clicked" is the name of the function we need to write that will be called when the 'New' toolbar button is clicked.
Save the glade project and close glade.
Writing The Code
This is where the fun begins. Open up your text editor and create src/main.c. We're going to step through this code one section at a time starting from the top.
 1: /* the config.h file generated by the autotools */
 2: #ifdef HAVE_CONFIG_H
 3: #  include <config.h>
 4: #endif<span style="color: #b59000"><span style="color: #000000"></span>
</span>
This section has a few preprocessor directives to include a file called config.h. The config.h file is generated by a program called 'autoheader' which is part of the GNU 'autotools'. Although 'autotools' are an important part of Gnome application development, it is beyond the scope of this document.
 6: /* this will hold the path to the glade file after the "make install" */
 7: #define GLADE_FILE PACKAGE_DATA_DIR"/gnome3/gnome3.glade"<span style="color: #b59000"><span style="color: #000000"></span></span>
Here we're defining the path to our gnome3.glade XML file. PACKAGE_DATA_DIR is defined in the Makefile generated by the autotools and is platform dependent. On my Fedora system, PACKAGE_DATA_DIR ends up being /usr/local/share/ and thus, after compiling and installing this application on my system (using the make install command), the glade file for this application will be located at /usr/local/share/gnome3/gnome3.glade.
9: #include <gnome.h> 10: #include <glade/glade.h><span style="color: #b59000"><span style="color: #000000"></span></span>
These includes should look fairly obvious, however, I want to point one little thing out. The included header files will recursively call the libraries from which they are derived. In this case, gnome.h is going to call gtk.h which is going to call glib.h etc. So it is not necessary to include gtk/gtk.h for a Gnome application.
The glade/glade.h include is for libglade which allows us to generate our user interface from the glade XML file.
12: /* callback function prototypes */
13: static gint delete_event_cb(GtkWidget* w, GdkEventAny* e, gpointer data);
14: static gint destroy_cb(GtkWidget* w, GdkEventAny* e, gpointer data);<span style="color: #b59000"><span style="color: #000000"></span></span><span style="color: #b59000"><span style="color: #000000"></span></span><span style="color: #b59000"></span>
These two lines declare "callback" functions, which is why I have added the '_cb' suffix to their names. These are going to be "connected" to a signal. I'm going to leave it at that for now, we'll see these again further down in the code.
17: int main (int argc, char *argv[])
18: {
19:   GtkWidget *app_window;          /* main application window widget */
20:   GladeXML *gxml;                 /* glade xml file */
When we layed out our interface in the previous section, I pointed out the naming conventions used with the widgets. We see that again here where we are declaring two variables. First, app_window is a pointer to a GtkWidget type. Notice the 'Gtk' prefix. The GtkWidget type is therefore part of the GTK libraries. The next line we declare gxml as pointer to a GladeXML type. This must be part of the Glade library, or libglade.
At first you may be asking why we are declaring app_window as a GtkWidget and not a GnomeApp. Here's that object hierarchy again. Remember that GnomeApp was derived from several objects going back to a GtkWidget and eventually all the way back to a GObject. Thus, a GnomeApp widget is a GtkWidget, and for that matter, it is a GObject. A GtkWidget is the base object of all widgets, and it has functions that are common to all widgets. For example there is a function to show widgets called gtk_widget_show() which takes a pointer to a GtkWidget as a parameter. Therfore we typically declare any widget as their base object class, a GtkWidget.
So we now have app_window which will reference our GnomeApp widget (but does not yet) and we have gxml which references a GladeXML object which we will use to build the interface from the Glade XML file.
22:        /* initialize libgnome */
23:        gnome_program_init (PACKAGE, VERSION, LIBGNOMEUI_MODULE,
24:                            argc, argv,
25:                            NULL);<span style="font-family: monospace"></span><span style="color: #b59000"><span style="color: #000000">
</span></span><span style="font-family: monospace"></span>
All GTK+ and Gnome applications have to call a function to initialize the libraries before any GTK+ functions are used. In a pure GTK+ program, you will see gtk_init(). This function, gnome_program_init() is specificly for Gnome applications. A lot of the code you see, especially in tutorials, you will see gnome_init() instead-- which actually looks nicer because it doesn't have all those arguments being passed to it. However, gnome_init() is a deprecated function and should not be used. You should read about the gnome_program_init() in the API documentation. You're definetely going to need to know about this function, however, for now I'm just going to briefly describe it as it applies to this program.
PACKAGE and VERSION are defined in the config.h file which is automatically created by the autotools. For this program, they are 'gnome3' and '0.1' respectively. LIBGNOMEUI_MODULE is defined in libgnomeui.h (which we've included indirectly by including gnome.h) and is a module containing the information to initialize the gnome libraries. argc and argv are the standard C/C++ application command line arguments we know and love. argc is the count of the command line arguments and argv is the string array of the command line arguments. Next, the function takes a series of attribute name/value pairs terminated by a NULL. To keep things simple and minimal for now, we're just passing the NULL termination. (An empty list of attribute name/value pairs).
In many of the tutorials and code you see using libglade, you will find often find a call to glade_init() at this point to initialize the Glade libraries (libglade). This is no longer a necessary call as new versions of the Glade libraries will be initialized on demand.
27:        /* create GladeXML object and connect signals */
28:        gxml = glade_xml_new (GLADE_FILE, NULL, NULL);
29:        glade_xml_signal_autoconnect (gxml);<span style="font-family: monospace">
</span><span style="font-family: monospace"></span>
This is where we use libglade to build our interface from the Glade XML file we previously created. If you are familiar with OOP languages (classes) then you're familiar with having to instantiate an object often using a keyword such as "new" (obj = new SomeObject;). C is not technically an object-oriented language, however, GTK+ is object based. This is achived using functions. With most GTK+ objects there will be a series of functions to create a new one of those objects, much like class constructors.
The call to glade_xml_new creates a new GladeXML object which gxml references, and it also creates all the widgets in the Glade file which we pass to the function as the first argument (we defined GLADE_FILE up at line 7). We're passing NULL as the other two parameters as we don't need to worry about them yet. One is used if we only want to build certain widgets in the glade file and the other is used for translation.
The call to glade_xml_signal_autoconnect() is a variation on another function, glade_xml_signal_connecr(). As it's name implies, the "autoconnect" function automatically "connects" the signals defined in the glade file to thier callback functions (signal "handlers") in the C code. Remember when building our interface, we specified that the "clicked" signal of the toolbar button should be "handled" by the function on_toolbar_new_clicked(). This call reads that information from the glade file and "connects" that signal to it's callback funciton.
31:        /* get the app_window from the glade XML file */
32:        app_window = glade_xml_get_widget (gxml, "app_window");
Now, it's all fine and dandy that libglade can "build" our interface from that XML file, but how do we reference those widgets then? The answer is glade_xml_get_widget(), where the 2 parameters are the GladeXML object gxml and the name of the widget we want to "get" respectively. In this case, we're getting "app_window" which is our GnomeApp widget. After this call, the GtkWidget pointer app_window references the GnomeApp widget. We'll be using this a few lines later.
34:        /* Connect signals for termination of application */
35:        g_signal_connect(G_OBJECT(app_window), "delete_event",
36:             G_CALLBACK(delete_event_cb), NULL);
37:
38:        g_signal_connect(G_OBJECT(app_window), "destroy",
39:             G_CALLBACK(destroy_cb), NULL);
These two lines are also "connecting" signals to functions which "handle" that event. We could have set these up in Glade just as we did with the "click" signal for the toolbutton and let the glade_xml_autoconnect() function connect the signals, however, I wanted to do it here in the code as a demonstration of how the signals are connected and show some casting macros. It's very important to understand the concept of signals and callback functions. There are 4 arguments being passed to the g_signal_connect() function calls.
First, G_OBJECT(app_window), which is our GtkWidget app_window being cast into a GObject pointer. G_OBJECT is a macro which does the casting. You'll find these casting macros are available for all the casting you need to do. The g_signal_connect takes a GObject pointer as it's first argument, however, our app_window is defined as a GtkWidget pointer, which is why we must cast it when passing it as a parameter. Remember that the GtkWidget is derived from a GObject, which is why we can cast it into a GObject pointer. Another example, is if we have a function that requires a GtkWindow such as gtk_window_get_title(). We could cast app_window into a GtkWindow object pointer using the GTK_WINDOW macro. This is where that object hierarchy is so cool. We can use the functions for any of the classes from which a widget is derived by casting the widget poitner to the appropriate type.
The second parameter in the g_signal_connect() function is the name of the signal which we are connecting a function to. As you can see, we have 2 signals that we are connecting functions to. The first is the "delete_event" signal which is emitted when we request that the window be closed. Clicking the little 'x' in the top of the window will invoke this signal. Next is the "destroy" signal which is emitted when the window is destroyed. We'll see why this is important later.
The third parameter in the g_signal_connect() function is the function which we are connecting to the signal. It is the "callback" function. We have to first cast the function into a GCallback pointer using the G_CALLBACK macro.
And finally we have the 4th parameter which is the data that we will pass to our callback functions, in this case, nothing (NULL).
What this means, is that when the "delete_event" signal is emitted, our function named delete_event_cb() will be called. When the "destroy" signal is emitted, our function destroy_cb() will be called.
41:        /* show the main window */
42:        gtk_widget_show (app_window);
Now we're ready to actually show our window. The gtk_widget_show() function shows a widget. We simply pass it our GtkWidget pointer, app_window which references our GnomeApp widget--the main application window.
44:        /* begin main GTK loop */
45:        gtk_main ();
46:
47:        return 0;
48: }
Now, the gtk_main() function is an "endless" loop. The loop will call our functions based on "events" occuring. A perfect example, is that "click" signal we setup for the toolbutton. When that button is clicked, the gtk_main() loop turns over control to our "handler" on_toolbutton_new_clicked() after which control resumes in the endless loop. This is how we achive the "event" based application. To break out of the loop, one of our functions has to call gtk_main_quit(), which is why we have a callback for the "destroy" signal as we will see in a moment.
50: static gint delete_event_cb(GtkWidget* w, GdkEventAny* e, gpointer data)
51: {
52:         /* callback for "delete" signal */
53:         g_print("main.c:delete_event_cb()n");
54:         return 0;
55: }
56:
57: static gint destroy_cb(GtkWidget* w, GdkEventAny* e, gpointer data)
58: {
59:        /* callback for "destroy" signal */
60:        g_print("main.c:destroy_event_cb()n");
61:
62:        /* quit application */
63:        gtk_main_quit();
64:        return 0;
65: }
We don't actually need to handle the "delete-event" for this application, however, I've added it to demonstrate when the events occur. In both the delete_event_cb() and the destroy_cb() I'm calling g_print() (which is very much like the printf function) to print out the name of the function. This is just so that we can see these events occur. Notice however, that the handler for "destroy" signal has a call to gtk_main_quit(). This is very important. Recall that the gtk_main() is an endless loop. If a user closes that window, it destroys the widget but the execution is still in that gtk_main()loop and the program hasn't actually terminated. It would "appear" to because the window is gone, but would still be running. By capturing the "destroy" signal we can break out of that loop when the user destroys (closes) the window. Aha, it's all making sense now.
One more thing to note, is the "delete-event" signal can return a value if you want to prevent it from occuring. The "delete-event" occurs when the widget (the window) is requesting to be destroyed. We can stop this from occuring if, for example, we want to first prompt the user to be sure they want to quit. With a dialog box and conditional code, we could return 0 if they are sure they want to quit, and 1 if they do not actually want to quit.
67: void <br style="font-family: monospace" />68: on_toolbutton_new_clicked(GtkWidget *w, GdkEventKey *e)<br style="font-family: monospace" />69: {<br style="font-family: monospace" />70: /* the 'New' toolbar was clicked */<br style="font-family: monospace" />71: g_print("main.c:on_toolbutton_new_clicked()");<br style="font-family: monospace" />72: }
Oh wow, we're almost done! This last function is the callback for the "click" signal we setup in Glade. I'm simply printing to the screen again so we can see that the signal was emitted and our callback function called. That's it, let's run it!